Planning And Building The Chicken Coop | Chicken Coop Joss And Main

Planning And Building The Chicken Coop
The Coop
In the beginning……….As we started planning the chicken coop I had no idea what I was building in regards to size and functional requirements for chickens. So we looked on line at images, plans and other blogs to get an idea what was needed for your average chicken. A lot of folks have been down this path and we are fortunate that they shared this information. Simply go to YOUTUBE and there is a wealth of information on chicken coops. I hope sharing our adventure of what we did will help someone else.

We decided on a basic chicken coop and run configuration approximately 6’ x 10’. The chicken coop is the raised shelter where the chicks sleep at night. The run is the closed protected playground, like a screened in porch for chickens. The actual chicken coop is 32” wide and 72” deep. I roughed it out in Illustrator to get an idea of scale.

For the foundation it appeared that 8” by 16” concrete blocks were the most popular material to use. I roughed in the location in our backyard and let Teddy pretend he was a chicken to see if it was big enough.

Some folks put two levels of blocks around the perimeter however we chose only one level. Besides saving money we were located on pretty firm ground. Starting at one corner we dug down past the grass level then used sand to level out the blocks. Basically we checked the blocks by a straight edge, square and a level as we laid down each block. Being square and level is important in this case.

After the foundation was in place we were not sure of the scale of the structure by simply looking at the screen. So we nailed together 2 x 4’s to get an idea how tall we should go. The roof was at a approximately 20 degree angle facing south.

After confirming the profile I decided to build flat frames out of 2 x 4’s. These were the basic ribs of the structure. These defined the roof line and the chicken coop floor height and one run end. Two frames for the run did not have the lower cross frame, however I nailed a temporary board in place until they were in positioned. There were five frames in total.

I used lap-joints which help to make a strong frame. So if you have carpenter skills, you will have your favorite way to make these whether by hand tools or power tools. And remember to always think safety when using tools…

Since these five frames are the core of the structure, I coated the ends with water sealer and cover the bottom with flashing. They will sit directly on to the concrete blocks so I wanted a little extra protection. I might note that the frames were also pressure treated lumber. However, we did use about 40% reclaimed wood I had from various sources in the total structure. So what is reclaimed wood? I hate to throw out any wood from old structures that have been torn down. Taking time and pulling out nails or hardware, a lot of old lumber is just as good as new.

We framed up both ends first then connected the two with the fifth frame in the middle. They were spaced 32”, 24”, 32”, 24” on center. The 32 “ sections were the width of the coop and the doorway for the run. The floor frame of the coop was 24” of the bottom and the framing continued across the run. The rafters were slightly under 96” in order to allow 8 foot corrugated metal roofing.

After we got the main frame up, I made up the design as I went. I equally spaced out the uprights at the end of the run and nailed into place. I continued the rafters across the top at the same spacing. I used 1 x 6 decking boards for the baseboards.
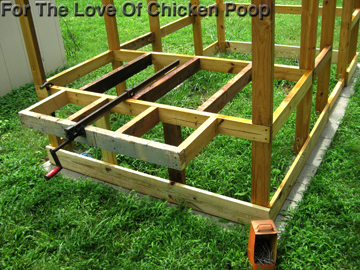
Next, I framed out the floor of the nesting box from the side of the chicken coop framed floor. Furniture clamps really come in handy when you are trying to hold something in place.

When looking at chicken coop designs on line, most of them where just sitting on blocks with no anchor to the ground. In Memphis we get a lot of freaky storms with wind so I had the fear of the whole structure blowing over. So I dropped two, 4 x 4’s three feet into the ground on each end. I bolted them to the structure and mixed concrete and filled the hole. May not be needed but I sleep better knowing there in an anchor.
