Building A Pallet Wood Hen House Chicken Coop And Prototype Tiny House Part 1 Design Construction | Chicken Coop Johannesburg

Building A Pallet Wood Hen House Chicken Coop And Prototype Tiny House Part 1 Design Construction
With our house up for sale, we have two main priorities, one is having all the hen houses upgraded to ones that can be easily dismantled and moved with the hens and the other is having a plan for the tiny house we are going to take with us when we move.

Weve thought this over and decided that it will be more ecological, less costly and more permanent than buying an RV or caravan to live in whilst constructing our new Eco House. To this end we designed the hen house not just as accommodation for the hens but as a prototype for something we could build here in the workshops and then take in kit form to our destination. As you will see, when you watch the film on construction and assembly, this design can be made with an extra inner skin of cladding and the gap between filled with straw or hay for insulation. A couple of years back we built just such a tiny wood and straw house with a friend and his three boys, whilst they waited to build their own main house. The design of incorporating an insulating layer of straw and hay is often coupled with building the house on pillars. This latter, to leave an air-gap underneath, which can then be boxed in, is a popular way of building a tiny house both here in France and Quebec. It will be of particular use to us in moving to Brittany, where in the Winter months it can be slightly damp!
Weve thought this over and decided that it will be more ecological, less costly and more permanent than buying an RV or caravan to live in whilst constructing our new Eco House. To this end we designed the hen house not just as accommodation for the hens but as a prototype for something we could build here in the workshops and then take in kit form to our destination. As you will see, when you watch the film on construction and assembly, this design can be made with an extra inner skin of cladding and the gap between filled with straw or hay for insulation. A couple of years back we built just such a tiny wood and straw house with a friend and his three boys, whilst they waited to build their own main house. The design of incorporating an insulating layer of straw and hay is often coupled with building the house on pillars. This latter, to leave an air-gap underneath, which can then be boxed in, is a popular way of building a tiny house both here in France and Quebec. It will be of particular use to us in moving to Brittany, where in the Winter months it can be slightly damp!
The Hen House

As if to prove my previous statement, when we had constructed all the parts of the house we had to leave the assembling of it for a couple of weeks due to torrential rain. In the meantime, Sue made up this artists impression of the final design!

This design was tried and tested. We had already had one up and running for two years and the hens loved it. The main cost (total of which is around 25 Euros (Dollars), was the price of the roof covering - a heavy duty tarpaulin. This is necessary if, like us, your hen house can be subjected to all types of severe weather conditions.
Materials

We used twenty-four standard (120cm x 80cm), untreated pallets in all. These included the four which were used for the base. Obviously, if you only have a few hens the base can be cut down but for ease of cleaning and access the height should be kept the same.
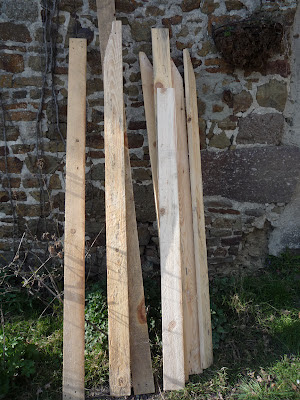
To complete the complement of pallet wood, we also used twenty-four planks (1800mm in length and 23mm thick). These were cut down to a width of 40mm. These planks were obtained from the uprights of pallets used to transport furniture and can be found at most outlets selling sofas, beds and larger items. They are also used by companies making or transporting glass and double glazed window units - look around your area to see whats on offer.
The Base

Start by prising the planks from the four foundation pallets.

Then reposition and renail with additional planks.

Bend over nails. Using long nails is a secure way of anchoring the planks to the support frame.
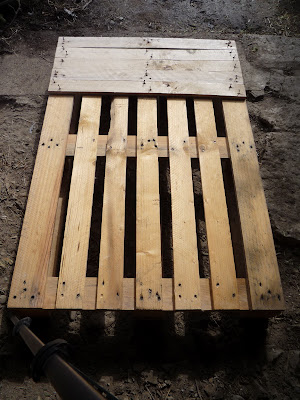
Alternatively, if the planks are difficult to remove for repositioning and you have plenty of pallet wood available, nail a layer of planks on top of the pallet at right angles to the original planks.
Wall Panels and Doors
Each side has two panels of different lengths to avoid the wall joints coinciding with the base pallet joints, which would weaken the structure.

Use the pallet as a gauge to ensure the correct height of the wall panel frames (standard length of 120cm) is attained. In the film you will see that I chose one panel of 1.40m length and the other 1.00m.

Once made and checked for square, add cladding.

On both gable end walls, provision is made for a door. This is needed for a good through draught in hot weather and also for ease of cleaning and removal of perches.

Make door frame and check for fit.

Clad door and fit hinges.
Gable Ends

Cut base of triangle to the exact width of wall and cut a 45° angle at each end.

Mark and cut other two sides of gable end panel and screw together.

Clad

Trim
Roof Panels

Make up four roof frames using foundation pallets as an assembly bench

Cover with tongue and groove cladding.
Sit back and watch the film..

Bob and friend looking forward to assembling the house. The assembly is shown in the following three part blog posts and includes the demolition of the old hen house and the laying of the new foundations - the first one can be found here
All the best, Andy
© Andy Colley 2014
RETURN TO GREEN LEVER CONTENTS PAGE FOR MORE ARTICLES
Building A Pallet Wood Hen House Chicken Coop And Prototype Tiny House Part 1 Design Construction